What do you do with your fabric scraps? I put mine in a tub to deal with later. This is a good idea if you have a small tub and take time to do something with the scraps before the tub is overflowing. Do you have a system for scrap storage? Is it working for you? I have gone through lots of different configurations for scraps over the years and like everything organizy, it’s good to make changes to meet new space constraints. When I went through my last organization flurry, I found piles of scraps in all kinds of different places. I had neatly organized bags of leftovers from quilts I had made and a tub of scraps from things I had cut out. AARRGG. I took the leftover fat quarters and 5 and 10 inch precut squares from their bags and put them together in see through tubs. Yes I mixed those fat quarters together. But look at that mess on my cutting table, what to do with that. The Accuquilt Go was the answer. I ironed all of the fabric pieces and put them on the die with the best fit and cranked away. It took forever because I let my scraps get away from me. I read somewhere that cutting scraps into 2.5 inch squares and strips, and 5” and 10” squares is the best strategy because that’s the size of pre-cuts and patterns are written for these size fabrics. My Accuquilt Go has dies for 2.5, 3.5, 4.5, 6.5” squares and triangles for each of those sizes as well. I will have to adjust patterns requirements for these sizes. If the fabrics were the size to cut 5 inch and 10 inch squares I cut them using my rotary cutter. It is so satisfying to have all of your fabrics cut and ready to be used. Now I have to use them! The big pieces like 10” squares, fat quarter and 2.5 “ strips fit in these see through tubs. They are light weight and easy to get into to find fabrics and put fabric away. I keep the small pieces boxes under my cutting table. My solution to not having to spend so much time cutting scraps is having a smaller collection basket and labeled boxes to put the cut pieces in. We will see how that works.
0 Comments
Ginger cookies are a holiday delight. You can find them rolled thin or made into houses. This recipe is for a semi firm dough, rolled into small balls, then into sugar and baked. It isn’t a thin cookie, it’s a robust mouthful of ginger joy.
Ingredients 1 stick + 7 Tablespoons of butter 1-3/4 Cups granulated sugar 1 egg - room temperature 1/3 cup molasses 2-3/4 cups white flour 1-1/4 tsp baking soda 1-3/4 tsp cinnamon 1-3/4 tsp ginger 1/2 tsp salt 1/3 cup sugar for rolling the cookie before baking Preheat oven to 350F.
tsp = teaspoon Tbs = Tablespoon You can bring an egg to room temperature quickly by putting it in a glass of warm water. This fall I found a mystery on Quilting Gail's website and because I just love mysteries, I had to give it a go. It was fun to participate in this quilt mystery. While I thought I'd stay on track, as usual life gets in the way and this quilt didn’t go as fast as I’d have liked. I started this in my schoolhouse cabin in October, thinking I’d whip it together as each clue was posted. While the first 3 clues went together fast, clue 4 took awhile to complete. I finally finished the top and I’m ready to post it. I love the pattern and the way the jelly roll I chose made it look. Find Clue 1 Here. I chose Shine On, a jelly roll by Bonnie and Camille and solid white for the background. Find Clue 2 Here And Finally, Clue 5 is Here. This quilt is set on point which makes it a little tricky to put together. I had to do a little seam ripping because I'd sewn a couple of blocks the wrong way. I recommend taking a picture of the final configuration and using that when putting it together. Looking at the photo may help you see if there are mistakes when you start sewing too. In my case....no. I like the way it turned out. It's a fun and easy pattern that I will put in my go-to quilt pattern pile.
Binding the raw edges of your finished piece is the final stage, where the active process of machine sewing the binding to the quilt followed by the passive and reflective process of hand sewing bring closure to your work. ![]() First you must choose the fabric you will use for your binding. It is likely you will need more than one strip so cut enough 2-1/2" strips, that when sewn together, will make a strip long enough to go completely around your quilt. ![]() You will need to sew these strips together. It is best to sew them on the diagonal so they don't cause lumps in the side of your piece. ![]() Chain Piece your strips. ![]() Cut the excess 1/4 inch away from the seam stitching.. ![]() Press the seam to one side. ![]() Fold the binding strip in half, wrong sides together, and press. You will have a long 1-1/4" strip. ![]() Trim your quilt sandwich so the edges are straight. ![]() Match the raw edges of the folded 1-1/4" strip to the raw edge of the quilt top. Leave about 12" of the strip loose. ![]() Using a 1/4" seam sew the binding strip to the quilt top. I use my walking foot for this step. ![]() Stop when you get 1/4" from the end of the quilt top, at the corner. Backstitch to secure the seam. Cut the thread. ![]() Turn your quilt around as shown in the picture below. Fold the binding so you have a 45 degree angle as shown below. ![]() Fold the binding down and match the raw edges again as shown below. ![]() Using a back stitch to secure the seam, begin at the top of the quilt/binding and sew to 1/4" before the next corner. Follow the same procedure to turn each corner. ![]() Leave a 12 inch unsewn opening between the beginning and end of your binding You should have 12 inches of unsewn binding strip at each end. ![]() Open your binding and using a small ruler and mat, make a 45 degree diagonal cut on one side of the binding strip. ![]() Lay your small cutting board on top of the quilt where you are cutting your binding strips. Put the the uncut binding strip on top of the board and then lay the cut strip on top of the uncut strip. using your small ruler, measure 1/2 inch from the top edge of the diagonal strip and mark the uncut strip. ![]() Move the cut strip out of the way. Using the marking as a reference point, lay your small square on the uncut strip. Be sure your cutting the diagonal the right way. I've made this mistake. ![]() After your two sides are cut, sew your binding pieces together. Having a large opening helps with this step. Twelve inches is a bare minimum. ![]() Sew the binding onto the quilt. ![]() Press the binding away from your quilt top. ![]() Turn your work over and press the binding so it covers the seam on the back side. ![]() Press your binding all the way to the end of the corner so you can make a crisp corner. ![]() Fold he binding at the corner so you have a 45 degree angle at the back of the piece. ![]() Hand sew the binding at the back using a blind stitch. ![]() Sit back and admire and enjoy your lovely finished project. This is the best pillow case pattern ever. You can choose your fabric and then whip this baby together in a few minutes. Standard Pillow Case For each pillow case you will need: 1/4 Yard Cuff Fabric 3/4 Yard Pillow Body Fabric 2” Strip (optional) Cut WOF. Iron the trim, lengthwise, wrong sides together. You should have a 1”X 42” strip. Place the cuff fabric on a hard surface, right side up. Place the trim on top of the cuff, matching raw edges at the top end of the cuff. Note, your salvage edges will be on each side of the cuff and the raw edges will be at the top and bottom. Lay the pillow body fabric on top of the cuff and the trim, right side down, matching the raw edges. PIN, PIN, PIN.... be sure to pin the three sections together securely. ![]() Roll the pillow body up toward the pinned edge. Be sure to leave room for a seam. ![]() Wrap the unpinned edge of the cuff fabric around the body fabric roll. RE-PIN securely in place. Sew a 1/4” seam across the pinned edge, removing pins as you go. Press the seam to set it. Pull the pillow case body roll out of the sleeve case. Press your seams flat. Fold your pillowcase in half matching selvedge edges, wrong sides together. Pin the trim of the pillowcase so it stays together when you cut. Line your ruler up with the cuff of the pillowcase so your cut will be straight. Then, trim the salvage edges off of your pillowcase.. Cut the bottom of the pillow case to square it up. After your case is trimmed nice and straight, with fabric wrong sides together, pin the raw edges and sew them together using a 1/8" seam. Trim the corners. Turn the pillowcase inside out and pin the top and trim pieces in place. Sew a 1/4” seam on the inside of the pillowcase, along the seam edges. This seam will encase the raw edge on first seam. ![]() Turn the pillowcase right side out and press the pillowcase one last time.
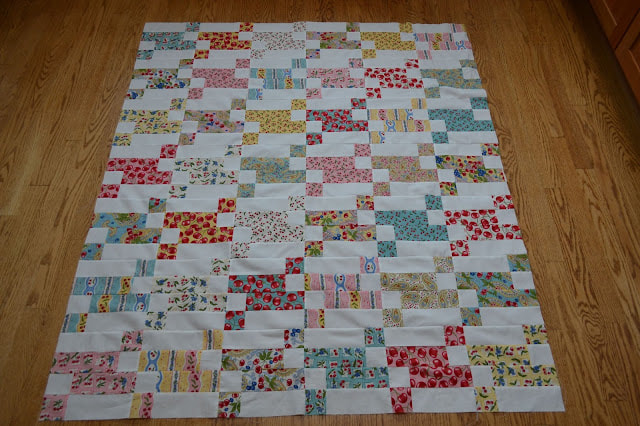
I found a fun cherry print jelly roll several years ago, but like so many things, it was put away in a safe place and found again much later. I saw a quilt project I liked and I thought it would be easy to replicate it from the printed page and make it with this jelly roll bundle. I'm not sure how I did it but I got things a little mixed up and while it is similar to the project I saw, it is much different. I have only made one but I wrote notes and took pictures so I could share it with you. If you would like to make this quilt, this is what you need for one quilt that measures 56" X 96": 1 Jelly Roll and 3 yards of background fabric-for a quilt without borders. If you want to put borders on the quilt, add the amount you need for the border to your materials. Cutting: Cut each of your jelly roll strips into (4) 6.5" rectangles and (4) 2.5" squares. Cut your background fabric into (11) 2.5" strips and (11) 6.5" strips. Sewing: Sew all of your 2.5" jelly roll squares to your 6.5" background strips and all of your 6.5" rectangles to your 2.5" background strips. Press the seams toward the jelly roll fabric. 
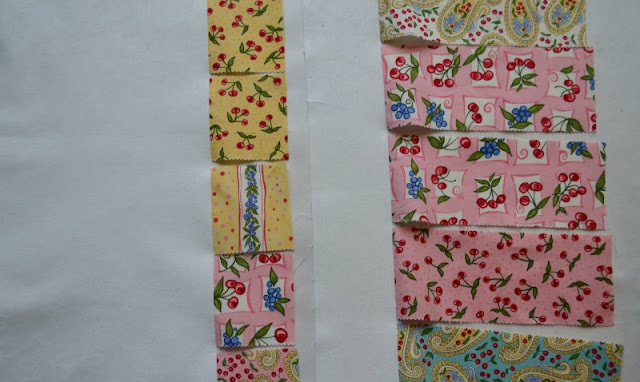
Cut each of your strips into 2.5" X 8.5" rectangles. You will have 168.
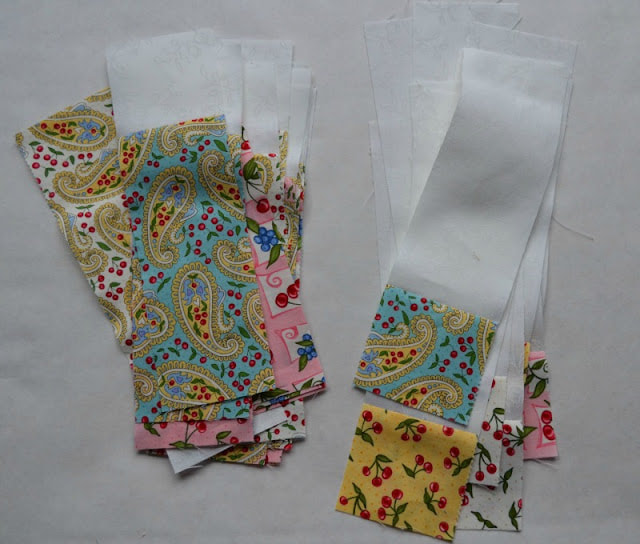
Sew all of these strips together to make a 4.5" X 8.5" rectangle as shown. Be sure the background 2.5" square is on the top of the strip and sew on the right side of the strip. 
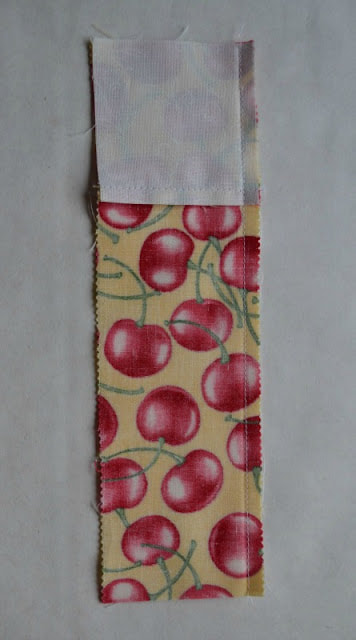
To make your quilt block, Sew your units together. 
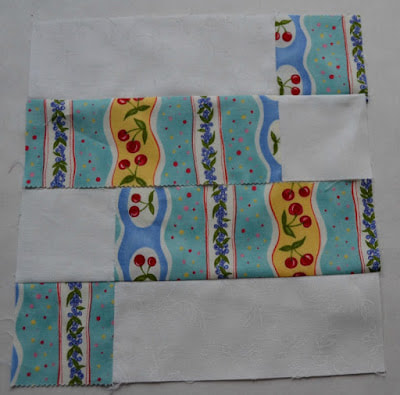
Sew y0ur blocks together with 7 rows of six blocks.
I am moving my blog to this site. I began blogging in 2013 using Blogger. You can find the blog Here. Blogger was a great way to get started and I loved meeting people through linky parties and comments. Because it was so easy, I was a little afraid to try this format. So, here goes....
You will find quilting and sewing ideas here. I also have a few things to sell and you can find what your looking for with the buttons at the top of the page. I have been collecting free patterns posted by fabric companies over the years, and you can find them using the "Free Patterns" button. Let me know if you try any of them. |
AuthorHello and Welcome! My name is Kathi and I've lived in Alaska forever. I love to sew and craft the long winter nights away. CategoriesArchives |